Cracking Mac OS X Passwords
In this post I will demonstrate how to both extract and crack Mac OS X passwords. The OS X variants that this tutorial is aimed at are 10.4 (Tiger), 10.5 (Leopard) and 10.6 (Snow Leopard).
Whilst Mac OS X is based on a Unix variant (BSD), there are several key differences between traditional Unix-based and Mac OS systems when it comes to password storage. Lets take a quick look at some of the differences.
If you have ever poked around on an OS X system, you may have noticed the absence of the /etc/shadow file. Whilst traditional Unix and BSD variants store their password hashes in /etc/shadow and /etc/master.passwd respectively, Mac OS X does not. Since the release of OS X 10.3 in 2003, Macintosh products have stored their shadow files in the /var/db/shadow/hash/ directory.
Another key difference is the way in which the two systems store their hashes. On a Unix-based system, every hash associated with the system is stored in the /etc/shadow file. This differs from OS X whereby each user has their own individual shadow file stored in the /var/db/shadow/hash/ directory. Each file is labeled by the user’s Globally Unique Identifier (GUID). N.B. A GUID is analogous to a Security Identifier (SID) on Windows-based systems.
Lastly, most Unix variants will use multiple rounds of the MD5 or DES cryptographic hash functions in order to encrypt system passwords. OS X systems encrypt passwords with the SHA1 hash function, coupled with a 4 byte salt.
In sum, OS X password storage has the following characteristics:
So, the first thing we want to do in this exercise is find out what our GUID is. We do this by invoking the Directory Service command line (dscl) utility. Implemented in OS X 10.5 to replace the deprecated NetInfo directory service, dscl uses the Open Directory Framework to store, organise and access directory information. For our purposes, the directory service holds information specific to each user on the system.
The command we use to extract our GUID is as follows:
Note: Replace <username> with the username of the user you wish to extract.
10.4 (Tiger)
STEP 2. EXTRACTING THE HASHES
Next, we want to extract the SHA1 hash from the shadow file. For this, we do the following:
At this point it should be noted that OS X has the ability to store Window NT and LANMAN hash representations. This will only occur if SMB/CIFS file sharing has been turned on. To extract these passwords from the shadow file, type the following:
At this point we are ready to crack the OS X passwords. To simplify this step, I have written a simple python script that can be downloaded here. To use this script, simply copy and paste the contents into a file (osx_crack.py) and type:
This method is nice if you are only interesting in cracking passwords from a local system. If, however, you have captured a hash from a remote system, or would prefer a more familiar password cracking utility, then John The Ripper can also be used for this step. In order for John to work, John will need to be patched with the 'Jumbo Patch' - allowing SHA1 passwords (referred to as XSHA in John) to be cracked. The patch can be downloaded from the following locations:
Once we have download/patched John, the extracted hash and username should be placed in a text file. For this example I have added the username ‘bob’ and bob’s hash (that I obtained in STEP 2) into a file called sha1.txt. The file has the following format:
bob:33BA7C74C318F5D3EF40EB25E1C42F312ACF905E20540226
We can then use John the crack the password:
”Loaded 1 password hash (Mac OS X 10.4+ salted SHA1 [32/64])”
A successful cracking attempt will appear as follows:
password (bob)
guesses: 1 time: 0:00:00:00 100% (2) c/s: 153000 trying: password
Additional Resources
Whilst Mac OS X is based on a Unix variant (BSD), there are several key differences between traditional Unix-based and Mac OS systems when it comes to password storage. Lets take a quick look at some of the differences.
If you have ever poked around on an OS X system, you may have noticed the absence of the /etc/shadow file. Whilst traditional Unix and BSD variants store their password hashes in /etc/shadow and /etc/master.passwd respectively, Mac OS X does not. Since the release of OS X 10.3 in 2003, Macintosh products have stored their shadow files in the /var/db/shadow/hash/ directory.
Another key difference is the way in which the two systems store their hashes. On a Unix-based system, every hash associated with the system is stored in the /etc/shadow file. This differs from OS X whereby each user has their own individual shadow file stored in the /var/db/shadow/hash/ directory. Each file is labeled by the user’s Globally Unique Identifier (GUID). N.B. A GUID is analogous to a Security Identifier (SID) on Windows-based systems.
Lastly, most Unix variants will use multiple rounds of the MD5 or DES cryptographic hash functions in order to encrypt system passwords. OS X systems encrypt passwords with the SHA1 hash function, coupled with a 4 byte salt.
In sum, OS X password storage has the following characteristics:
- Password hashes are stored in the /var/db/shadow/hash/<GUID> file
- Each user has their own shadow file
- Local OS X passwords are stored as SHA1 hashes
So, the first thing we want to do in this exercise is find out what our GUID is. We do this by invoking the Directory Service command line (dscl) utility. Implemented in OS X 10.5 to replace the deprecated NetInfo directory service, dscl uses the Open Directory Framework to store, organise and access directory information. For our purposes, the directory service holds information specific to each user on the system.
The command we use to extract our GUID is as follows:
Note: Replace <username> with the username of the user you wish to extract.
10.4 (Tiger)
# niutil -readprop . /users/<username> generateduid10.5 (Leapord) and 10.6 (Snow Leapord)
# dscl localhost -read /Search/Users/<username> | grep GeneratedUID | cut -c15-This should return a value which appears in the following format: A66BCB30-2413-422A-A574-DE03108F8AF2
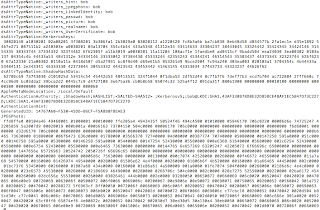
STEP 2. EXTRACTING THE HASHES
Next, we want to extract the SHA1 hash from the shadow file. For this, we do the following:
# cat /var/db/shadow/hash/A66BCB30-2413-422A-A574-DE03108F8AF2 | cut -c169-216You should have been returned with a SHA1 hash that looks similar to the following: 33BA7C74C318F5D3EF40EB25E1C42F312ACF905E20540226
Note: Replace the above GUID with the one you have extracted from the previous step.
At this point it should be noted that OS X has the ability to store Window NT and LANMAN hash representations. This will only occur if SMB/CIFS file sharing has been turned on. To extract these passwords from the shadow file, type the following:
NT:STEP 3. CRACKING THE PASSWORD
cat /var/db/shadow/hash/A66BCB30-2413-422A-A574-DE03108F8AF2 |cut -c1-32
LANMAN:
cat /var/db/shadow/hash/A66BCB30-2413-422A-A574-DE03108F8AF2 |cut -c33-64
At this point we are ready to crack the OS X passwords. To simplify this step, I have written a simple python script that can be downloaded here. To use this script, simply copy and paste the contents into a file (osx_crack.py) and type:
#python osx_crack.py bobNote: 'bob' is the username whose password we want to crack.
This method is nice if you are only interesting in cracking passwords from a local system. If, however, you have captured a hash from a remote system, or would prefer a more familiar password cracking utility, then John The Ripper can also be used for this step. In order for John to work, John will need to be patched with the 'Jumbo Patch' - allowing SHA1 passwords (referred to as XSHA in John) to be cracked. The patch can be downloaded from the following locations:
Once we have download/patched John, the extracted hash and username should be placed in a text file. For this example I have added the username ‘bob’ and bob’s hash (that I obtained in STEP 2) into a file called sha1.txt. The file has the following format:
bob:33BA7C74C318F5D3EF40EB25E1C42F312ACF905E20540226
We can then use John the crack the password:
# ./john sha1.txtIf John is successful in recognising the hash, the following message will be displayed:
”Loaded 1 password hash (Mac OS X 10.4+ salted SHA1 [32/64])”
A successful cracking attempt will appear as follows:
password (bob)
guesses: 1 time: 0:00:00:00 100% (2) c/s: 153000 trying: password
Additional Resources

The only problem I get with this so far is the second command with the cat gets me a Permission denied.
ReplyDeleteCould've been awesome to know.
ME TOOOOOOOOO
DeleteNOOOOOOOOOOO
You need to make sure that the your root login is activated. You have to activate your "login root" command before you can begin looking for the hash. If not, then you will not be given permission to retrieve the info you need later in the "cat" phase. On OS X 10.6+ you can turn your root login on by going to "system preferences", then opening "accounts", then clicking the "lock icon" at the bottom left, input your password, then above the "lock icon" you click "login options", then look to the right and click "join", then click "open directory utility", then go to the top of your computer screen and click the "edit" tab and activate your root login. :D
DeleteTried it with sudo just for fun, but need the password that I'm trying to find.
ReplyDeleteIrony ^_^
Greg,
ReplyDeleteThanks for your comments!
Yes, unfortunately (for us) this is how Unix and Unix-based variants deal with passwords. A shadowed password means that only those with the relevant privileges (typically root) can view them.
Password cracking in this instance would be used when you have already exploited/gained access to the system.
I believe the syntax is incorrect for step 1 when used in 10.6
ReplyDeleteyou can enter to verbose mode before the computer stars by pressing 'cmd + s' then you have root access immediately to everything therefore you can follow this and crack any mac
ReplyDeleteMackaber,
ReplyDeleteI am sending the command from root. I believe that there is an issue with the snytax of the first command when sent to the 10.6.3 kernel
demonstration here:
http://docs.google.com/View?id=dgpcw55k_42hp993fgv
@andrew.stinton
ReplyDeleteTry typing the command in manually instead of copy/paste. Let me know how you go :)
I have my password hash and I have the latest version of john the ripper jumbo patch for mac osx. how do i compile the run file found in the package, and do I even need to do that?
ReplyDeleteWould be glad if someone could help me. I have JTR, however is it possible to provide a COPY/PASTE code for entry in the Mac Terminal to CRACK 'login.keychain'?
ReplyDeleteI have searched the entire web which offers JTR posts in complicated terms. I think this would be helpful to ALL who have this need. This tutorial is great. Would be very nice if the same step-step could be out here for the keychain file.
Thanks in advance!
hello,
ReplyDeletei tried this guide on a mbp running SL 10.6.5 as root, but i keep getting the error "No password hashes loaded" in the final step.
i followed all steps and i made sure there is no syntax error within the previous commands, but jtr seems to be unable to extract the password from the hash in the end.
anyone have an idea maybe ?!
ok i found the solution (my comment is the previous one (SL 10.6.4))
ReplyDeletethe "jumbo patch" does the trick !
your password must be "bob1900" without the quotes "" right ?!!
ReplyDeleteyou really want to use the --single MOD when first crack or you are not sure what MOD to use, like so:
# ./john --single sha1.txt
For OS 10.6.3, the first command should be changed to:
ReplyDeletedscl . -read /Users/ GeneratedUID | cut -c15-
sorry, thats really:
ReplyDeletedscl . -read /Users/(username) GeneratedUID | cut -c15-
tried cracking a 10.6.4 hash with the Jumbo patched JTR. let my macbook go at it for 30 hours with no success. is something wrong or am i just trying to crack a ridiculous password?
ReplyDeleteoh my god, you have been my saviour. I had an old macbookpro which I needed to resurrect and this information helped me to crack the forgotten password. Once I ran "John The Ripper", it took 4 seconds to crack.
ReplyDeleteBTW, I used a firewire cable to mount (Hold T when booting up) the old macbook to get to the hash files and extract the sha1 hash. Thanks muchly
dscl doesn't work in single user mode on 10.6. OSX returns an error about needing to enable it, but the command that OSX suggests doesn't work.
ReplyDeleteWorks perfect and shocked some clients with not so strong passwords… ;) Now they use much more secure passwords because they know it better.
ReplyDeleteAll instructions work up to the point of:
ReplyDeletedscl localhost -read /Search/Users/ | grep GeneratedUID | cut -c15-
At which poiint I get:
yld: lazy symbol binding failed: Symbol not found: ___bzero
Referenced from: /Users/M/Downloads/john/run/./john
Expected in: /usr/lib/libSystem.B.dylib
Would anyone be willing to help me with this?
that last post should show:
ReplyDeletedyld: lazy symbol binding failed: Symbol not found: ___bzero
Referenced from: /Users/M/Downloads/john/run/./john
Expected in: /usr/lib/libSystem.B.dylib
Oh yea, make myself look super foolish.
ReplyDeleteI get to the point where I run:
./john hash.txt
(not the command dscl localhost -read /Search/Users/ | grep GeneratedUID | cut -c15- as listed above)
and that is when I get the erro that I posted.
Duhhhh - blonde moment I guess.
Hi Patrick, would be nice to have this article updated for 10.7 Lion because it doesn't work there …
ReplyDeletewhat does the c/s mean?
ReplyDeleteDoes it mean cracks per second?
If it does mean that mine says: ‘guesses: 0 time: 1:21:22:54 (3) c/s: 1968K trying: 1euy35h7′
Is 1968K too slow?
I'm using your precompiled python script, and here's the error I receive in Terminal on my Mac:
ReplyDeleteTraceback (most recent call last):
File "osx_crack.py", line 49, in
p = Popen("cat /var/db/shadow/hash/" + guid[1], shell=True, stdout=PIPE) #PULL HASH FROM SHADOW FILE
IndexError: list index out of range
Do I need to edit this script with the GUID and hash values from steps 1 & 2? It's a little unclear what to do with this information in step 3.
hi. I've been trying to get this to work on a used Macbook with Leopard for 2 days now, but when I type in the first command in terminal, it comes up with:
ReplyDeletes~macbook:~ lizzie$ dscl localhost -read /Search/Users/ Marjorie Humeniuk | grep GeneratedUID | cut -15-
cut: illegal option -- 1
usage: cut -b list [-n] [file ...]
cut -c list [file ...]
cut -f list [-s] [-d delim] [file ...]
please tell me you can help me..... I went to a different site with the same tutorial at first, but I havent heard back from them, and it doesnt look like they're answering comments any more, so I came here.
If you typed it just as you have it posted above, then your syntax is incorrect. You have to delete the space before the user name and put it in quotes... so like this:
Delete.../Users/"Marjorie Humeniuk"
Also it's "cut -c15-" ... you are missing the c
Always check your syntax... in other words, make sure you typed it correctly.
Hi, I really really hope that you can help me:
Deletecat /var/db/shadow/hash/094385CA-5D95-4123-A898-7DD12A278878 | cut -c169-216
when I input this command the terminal says: No such file or directory
What I'm doing wrong?
Thank you, Leonardo
Part 2 no work!
ReplyDeleteOn a iMac running
ReplyDeleteuname -a
Darwin Kernel Version 12.3.0: Sun Jan 6 22:37:10 PST 2013; root:xnu-2050.22.13~1/RELEASE_X86_64 x86_64
I get these results at this same point:
sh-3.2# cat /var/db/shadow/hash/FD7CC6A-4D18-427A-BBB1-31907B915175
cat: /var/db/shadow/hash/FD7CC6A-4D18-427A-BBB1-31907B915175: No such file or directory
This is because /var/db/shadow/hash is empty"
sh-3.2# ls /var/db/shadow/hash/
sh-3.2#
Likewise for
h-3.2# cat /private/var/db/shadow/hash/2FD7CC6A-4D18-427A-BBB1-31907B915175 |cut -c169-216
cat: /private/var/db/shadow/hash/2FD7CC6A-4D18-427A-BBB1-31907B915175: No such file or directory
sh-3.2# ls /private/var/db/shadow/hash/
sh-3.2#
I was able to find the SHA1 passwd in
sh-3.2# dscl localhost -read /Search/Users/Ovid |grep SHA1
There is a line like this:
AuthenticationAuthority: ;ShadowHash;HASHLIST: ;Kerberosv5;;Ovid@LKDC:SHA1.;LKDC:SHA1.
Take out the > user.txt
Then, you can say
./john user.txt
and decrypt the passwd.
I keep getting no output and returned to prompt after the first command on a 10.4.11 macbook. What's up with that?
ReplyDelete